Wednesday 27 January 2016

Patchwork with stitchery SAL: January

I have to confess that I wasn't very good at keeping on track with the 'Patchwork with Stitchery Sew-a-long' hosted by Martina of Sunshine Quilting towards the end of last year and, I had intended on doing a better job this year.


Patchwork with Stitchery SAL

However, January has whizzed past so quickly that I didn't get a new project made.


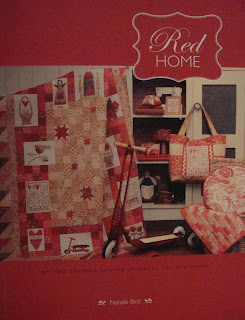
Instead, I thought I would share with you a pretty little stitchery I completed which is from the book 'Red Home' by Natalie Bird.  In the book this little stitchery is made into a tiny wall hanging but, I chose to frame it instead.


Such a simple design.... very quick to stitch and so cute.... it made the perfect gift! To see who else has linked up with a project, why not pop across and visit Martina


Next month I am going to be more organised and I have already chosen the little Gail Pan pincushion project pictured above to stitch.  This was Gail's free pattern  from a Buttermilk Basin blog hop that she took part in during the Summer of 2015 but which, I haven't got round to stitching yet!! 


Doll Quilt SAL

On the subject of sew-a-longs, I am also taking part in a doll quilt SAL hosted by Katrin and taking place in February.  If you want to participate too you can get all the details here.  Actually, there is a very cute little doll quilt in the Red Home book which I am tempted to make for it! 

TAST Week 26: Arrow or Arrowhead Stitch

Another Tuesday gone and another TAST stitch released! Stitch twenty-six of the TAST Challenge hosted by Sharon Boggon at Pin Tangle  is arrow or arrowhead stitch. Sharon has posted a well-written tutorial describing how to work this stitch on her blog.  There are plenty of photographs showing examples of how you might use it.


This is a very straight forward stitch which is really just a combination of straight stitches. Having said that, I did have a job keeping both sides of the arrowhead the same length (not easy if you are not using an evenweave fabric.)  I decided that it would look nice in one of the smaller boxes on my sampler and just filled in a small rectangle using variegated silk thread.


I think the next time I would make the arrowheads a little deeper so that they come to more of a point but, I am happy with these for now. The perimeter of the box was stitched with the same variegated thread using a stem stitch.

Monday 25 January 2016

CQJP Challenge 2016: Finished January Block

Hello! Today I would like to share with you my first block for the CQJP Challenge 2016.  I enjoyed participating in the CQJP Challenge 2015 so much, that I decided to take part in the 2016 Challenge.  Last year's challenge resulted in me making my first crazy quilt and I am really pleased with it.  I have it in my living room and I love looking at it!


This year I have decided to make a crazy dresden quilt using solid colour fabrics enhanced with ribbons as well as lots of embroidery stitches.  The inspiration for this came from a beautiful quilt made by Allie Aller called 'Crazy Dresdens' which was featured in the Summer 2015 issue of the magazine 'Modern Quilts Unlimited'.  It is a lovely quilt and I decided I would like to try something similar.


Each of my blocks this year will feature a quarter of a dresden plate decorated with ribbons and embroidery stitches.  At the end of the year when I have all twelve blocks finished I will piece them together either to form four large dresden plates or, alternatively, to create a wavy pattern across the quilt top.  I haven't decided which yet, I will probably let the finished blocks make the decision!


I have included a few close up shots of some of the embroidery stitches for you.  As well as the ribbon and embroidery, I also added some sequins to the end of each 'blade' of the fan which I have embroidered into place using blanket stitch wheels.


You will notice that I have left the non-dresden area of the block relatively free of embellishment.  This is because I intend to add some more embroidery in these areas once the blocks have been pieced together at the end of the year.


I am linking this post to the stitchery link-up at Super Mom - No Cape!  Pop across and have a look at what everyone else has been up to this week!  


Wednesday 20 January 2016

TAST Week 25: Twisted Chain or Rope Stitch

It is time for the next TAST stitch! Stitch twenty-five of the TAST Challenge hosted by Sharon Boggon at Pin Tangle  is twisted chain stitch or rope stitch. Sharon has posted a comprehensive tutorial describing how to work the stitches (which are basically the same stitch but spaced differently) on her blog as usual.  There are also some lovely photographs showing examples of how you might use the stitches.


This was another new stitch to me but, it is a relatively easy stitch to learn and I really loved working my sample of it.  I have worked several rows spaced differently in another of the rectangles on my new sampler.


I then stitched the outline of the rectangle using stem stitch. I really enjoyed working this stitch and as Sharon points out... 'Twisted chain stitch is one of those handy stitches which after you master it you wonder how you lived without it!' I will certainly be using it in some of my future projects!


I have also been busy making a few more cards.  This time a few birthday cards.  I have been having a lot of fun making them! 

Thank you for visiting and enjoy the rest of your week! 

Monday 18 January 2016

A 'Love Tree' Progress Report....

You may recall that I received a pretty cross stitch kit for Christmas from my sister-in-law called 'Love Tree' which was designed by Kim Anderson for Bothy Threads. I have been adding stitches to it here and there between other projects and I thought it was time for an updated progress report.  The last time you saw it I had just made a start on the tree trunk and it looked like this.....


After my few stitches here and there, I have now finished the top half of the tree trunk and branches and it looks like this.....


It is fairly slow work using the metallic thread to stitch with but, it does look pretty and I am looking forward to adding some other colours now.


As well as my cross stitch project, I have also been busy with some planning for my CQJP Challenge 2016 project.  Last year I was very new to crazy quilting and I just pieced and embellished each block as I went along. 


Although I was very pleased with the quilt that I finished, I did realise that perhaps a little more planning before starting would have been beneficial. This year, I have a very distinct idea of the sort of quilt I would like to make and I have been trying out a few ideas before piecing the blocks.  The above photo is a little glimpse of what I have been experimenting with. I hope the layout that I have in mind will work!

Click here!

You may have also noticed a new button on my right hand sidebar called 'Splendid Sampler'I have signed up to take part in a SAL of 100 blocks over the course of a year starting in February.  There are some fabulous designers taking part who have designed the blocks and, once the SAL is over, the blocks are going to be published in a book.  If you are interested in finding out more just click on the image.

I am linking this post to the Stitchery Link Party over at Super Mom - No Cape! as well as Design Board Monday over at Bits 'n' Bobs.  Why not pop over and have a look at who else has linked up? Have a lovely week! 

Wednesday 13 January 2016

TAST Week Twenty-Four: Interlaced Cable Chain Stitch

TAST has started again for 2016 and stitch twenty-four of the TAST Challenge hosted by Sharon Boggon at Pin Tangle  is an interlaced cable chain stitch. As always, Sharon has posted a comprehensive tutorial describing how to work the stitch.  Interlaced cable chain stitch leads on from the last stitch  (cable chain stitch) which was completed before Christmas.

2015 Sampler Needle Case Front

If you have been following my blog for a while, you will know that I decided to finish up my sampler of TAST stitches for 2015 by making it into a needle case so that I could start a new sampler for 2016.

Gail Pan 'Friends' Embroidery 

I had an idea in mind that I wanted to try for my 2016 TAST Sampler which, was to draw out a grid of squares/rectangles and fill each of the shapes with a new stitch each week.  I was busy in my sewing room thinking of how best to set the shapes out when I glanced up at a little Gail Pan wall hanging that I made about this time last year called 'Friends' and realised that the background grid that is in the pattern would be perfect!

2016 TAST Sampler Grid

So, I pulled out the pattern and copied the grid onto some background fabric and then backed it with fine, fusible interfacing ready for the first new TAST stitch to be worked.


I filled the top left hand rectangle with three rows of cable chain stitch using perle cotton thread and then worked the interlacing between the rows using variegated silk thread. The interlacing is quite tricky to work unless the rows of cable chain stitch match up evenly, so I did have to re-stitch one of the rows but, I am happy with how it looks now. I worked a stem stitch around the outside of the box in the same variegated thread to finish it off. 

Monday 11 January 2016

A quiet house....

After my son and his girlfriend left on Friday evening to return to university, the house seemed very quiet but, it wasn't too long before I cheered myself up by starting work on a couple of creative projects.


First on my list of things to do was to turn my 2015 TAST Stitch Sampler into a needle case. I started by defining the area of the sampler that I wanted to use.


Then I filled in any gaps with extra embroidery stitches until I was happy with it.  I only used the same TAST stitches that were already in the sampler.


I tidied up the edges of the sampler fabric by placing it on a piece of batting and then stitching along each side with a very small machine stitch so that all the embroidery threads were caught in the stitches. I could then trim the fabric piece to the size I wanted without the hand embroidered stitches coming undone which, is what I did next.


Then I pieced together the inside of the needle case, making a pocket and adding a piece of felt for needles.  The back and front were then pinned together and some binding added.  I finished it off by adding some velcro to fasten it with.


It makes quite a sweet needle case and I am all ready now to start a new 2016 sampler, which is just as well, as TAST starts again tomorrow!

Front

Back

The following day I had the house to myself and after finishing off some housework, I thought I would try my hand at making some cards. 


I started off by having a look through some card-making ideas on Pinterest. I pulled out all my card-making bits and pieces and had a go at making my first card.  I chose an idea I had seen which patched some squares of paper together and then you stitched over the paper with your sewing machine and a zig zag stitch. 


I was really delighted with the result which spurred me on to making several more cards. 


Each was a different idea and used some different techniques that I had seen and liked.


I now have eight 'Thank you' cards ready to be written and posted off.... I can see that card-making might be quite addictive!  Here they all are sitting on top of their envelopes some of which I also made.... it was a lot of fun!

I am linking this post to the next stitchery link up over at Super Mom - No Cape!  and Design Board Monday over at Bits 'n' Bobs. Why not pop over for a visit and see who else has linked up! 


Friday 8 January 2016

A new craft for 2016!

As I had the house to myself over New Year, I invited my sister to come to stay with me for a few days.  It had been a while since she was here and we had a lot of fun crafting and chatting! 


My sister makes beautiful handmade cards (which she blogs about here) and she was happy to show me some of the techniques that she uses.  It was a lot of fun and, as a result, I have decided that it would be nice to make a few handmade cards myself.


Over the years, I have collected quite a few bits and pieces of card making equipment (visiting shops and shows with my sister) and I have never really put it to proper use.  I thought it was about time that I put that right.  I have lots of ideas and, I really think a handmade card would compliment a handmade quilted gift!


So, don't be surprised if this year there is the odd post about a handmade card or two! I think I may well start with some thank you cards!


I have also started my 'Love Tree' cross stitch.  I started in the middle of the pattern which I believe is what is recommended and have stitched a small area of the tree trunk.  The trunk is worked in silver metallic thread, so I am having to work slowly to stop the thread from fraying.  I don't think it is going too badly so far.....


Hope you have a lovely weekend!

Monday 4 January 2016

A New Challenge for 2016!

Each year I like to learn a new skill if I am able.  Last year I took up crazy quilting and I took several marvellous classes online with Kathy Shaw which helped me tremendously.  I participated in the CQJP Challenge 2015 and I finished my first crazy quilt which I am very proud of.  In fact, I enjoyed crazy quilting so much that I am participating in the CQJP Challenge 2016.


This year one of my new challenges to myself is to learn more about foundation paper piecing and, I am participating in the Hasenbach ChallengeI have to confess that the blocks for this challenge are rather complicated for a beginner and, I nearly gave up before I had even started. However, with some kind advice from Katrin (who has been instrumental in running the Challenge for some years) I persevered and I have managed to complete one of the simpler blocks.


This block should make up part of the sashing of the main project which is run as a block of the month by Claudia.  However, as I don't think I am quite up to all the tiny little pieces that are required for the main blocks, I will probably end up making a quilt using a combination of the houses and the stars which are also a part of the sashing and which are simpler to piece.


Other plans for 2016 will include working on the cross stitch kit which I was given as a gift.  I haven't done any cross stitch for years, so this will be a nice change of style for me.  The design is 'Love Tree' by Kim Anderson for Bothy Threads. It will be fun to share my progress with you here.


Birthday Swap Blocks Made

Birthday Swap Blocks Received

There are also several projects which have blocks sitting waiting to be pieced together.  The first of these are the Birthday Swap Blocks which I received from friends from a FB group I belong to.  I have plans to make them into a lap quilt.  I am just waiting for one or two more late blocks to arrive.


I also have quite a number of Farm Girl Vintage blocks which I need to piece together into a quilt or two!


TAST will be continuing and recommences on the 12th of January.  I thought that it would fun to start a new sampler for the 2016 stitches so, I shall be making the sampler I used for the previous stitches into a little project.  I thought it would make a nice cover for a needle book..... what do you think?

My son has also asked me to make a table runner for the small flat he shares with his girlfriend so, that is also on the list as well as a number of other quilts which I cut out ready to piece last year but didn't get started on! Of course there are bound to be one or two 'extra' projects that insist that I make them!  So, lots to be getting on with!


I leave you with a couple of collage photographs of my favourite finishes from 2015.


Thank you for visiting and I am looking forward to sharing your creative plans for 2016 too!