Wednesday 29 March 2017

TAST Week 78: Feathered up and down buttonhole stitch.....

This week's stitch (week 78) for the TAST Challenge hosted by Sharon Boggon at Pin Tangle is the 'feathered up and down buttonhole stitch'.  As the name suggests, it is a combination of the 'up and down buttonhole stitch' and the 'feather stitch'.  You can find Sharon's tutorial for it here.


Feather Stitch
(Used to decorated a crazy quilt block)

I am familiar with both the feather stitch and the up and down buttonhole stitch as I have added them to projects in the past such as some of my crazy quilt projects. So, I was excited to try them as a combination.


Up and Down Buttonhole Stitch
(Stitched along the edge of the linen polka dot ribbon)

I really liked the look of the combined stitch and added a horizontal line of stitches to my sampler in variegated fine silk thread.


My new sampler is already filling up quite nicely.  Looking forward to next week's stitch now!


Hope you are all enjoying some creative time this week!

Monday 27 March 2017

Freehand machine embroidery...... a hedgehog...

If you follow along with my blog you will know that earlier this year I attended a workshop for freehand machine embroidery in Norwich with Abigail Mill.  I had a wonderful time and started an embroidery of our Chalet in Switzerland which I have since finished and you can read more about that here.


While at the workshop, I also took the opportunity to buy several of Abigail's pretty embroidery kits and just recently, I have finished putting one of the kits together.  I chose to make the hedgehog first.


Hand embroidered hedgehog

I really like hedgehogs and you may recall I have added several hand-embroidered hedgehogs to other quilts and projects.


The kit contained everything I needed to make this lovely little machine embroidered picture (I did add the bee and flower buttons myself) and I really had a lot of fun making it.  Once the embroidery was finished,  I mounted it using mount board and then framed it in a box frame.


It was such a quick and easy project and, as it was Mother's Day here in the United Kingdom on Sunday, I sent it to my mum.  I am pleased to say she liked it and it is now hanging on a wall in her house! I am looking forward to putting together some of the other kits I bought too! 

Saturday 25 March 2017

Using up some long lost treasures.....

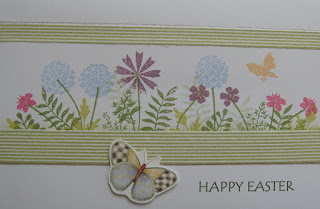
After all the fun I had with my sister making cards last weekend and, after discovering a sheet of Spring/Easter die cuts that I have had for years and had squirreled away, I decided that I really should make a few more cards.... this time in readiness to send at Easter.


The die cut sheet I had was designed by Debbie Mumm who I followed very closely when I first learned to quilt as she has written many quilting books. (Most of which I have on the bookshelf in my sewing room!)


I ran the card stock through my printer to print the outside greeting and also to add a greeting to the inside of the card.  The designs are very simple and mainly involved cutting and sticking which was easy to do and very therapeutic.  As with quilting/stitching the most difficult part was picking the colours and then positioning the pieces to make them look balanced (some are more successful than others).


There are a few cards which did not use the die cuts but other stickers and bits and pieces which I have had tucked away for a long time!  Surprising what you can find when you look in the right places!!


One of the Easter cards was made from a card I had made last weekend but hadn't felt entirely happy with. I had stamped the image too high on the card, so I cut it out and re-purposed it! I like it better now!  If you are interested in looking at the cards in greater detail there are individual photographs on my handmade card page.

Friday 24 March 2017

Still practising.....

Last year I dedicated a lot of time to practising my free motion quilting and I was extremely pleased with the progress that I made.  So, I am sure you will understand that I am very keen not to lose touch with the techniques I have learned to date.


However, the only quilting I have done since the beginning of the year are two little practise quilts made as a result of Lori Kennedy's challenge at the end of one of her Craftsy classes.


That was until recently, when I decided to revisit another Craftsy class I have followed taught by Christina Cameli.  Previously, when I followed along with Christina's 'Wild Quilting' class I didn't have the confidence to try out some of the techniques she taught but, now that I am feeling much more capable with my free motion quilting, I decided to try out mixing together some of the different motifs to make a background quilt pattern.


I mixed together pebbles, spirals and leaves and I really like how they look together. I really love the texture.


They were a lot of fun to quilt too, so I shall definitely be trying out some more combinations of motifs.


I have also just received a copy this wonderful new book I ordered.  It is written by Lori Kennedy and is called 'Free Motion Machine Quilting 1-2-3'. It brings together over sixty of Lori's delightful quilting designs in one place. I can't wait to get back to my machine and try some of them out!!  In case you are wondering what happens to the practise pieces or, perhaps you have some practise pieces that you don't know what to do with, Lori has also just written a blog post with a nice idea how to use them up..... I think I may give this a try!

Tuesday 21 March 2017

Time to Take-A-Stitch-Tuesday (TAST).....

For the first time in a long while I am actually stitching this week's stitch for the TAST Challenge hosted by Sharon Boggon at Pin Tangle on the right day!!  Stitch 77 is pistil stitch.  This is a very versatile little stitch and is basically a long-tailed French knot. You can find Sharon's tutorial for it here.


It is a stitch that I am familiar with, so it didn't take too long to add a row to my new sampler.


I used a variegated fine silk thread and stitched the individual pistil stitches in a semi-circular shape along the base line.


As you can probably see by now, my new sampler is going to have a criss-cross pattern (a bit like crossword puzzles).  I think it will be a nice compliment to the other two in my sewing room.


Sunday 19 March 2017

A lovely weekend....

This weekend my sister came to stay with me and we have had a really lovely crafting weekend.  My sister does not sew (well, she has completed a few hand sewn projects over the years) but her main pastime (when she is not at work) is making greetings cards, so when she comes to stay we usually have a lot of fun trying out a few card-making projects.


This visit was no exception and I managed to make nine cards which I am really pleased with. 


I started with the tree cards.  The trees were stamped onto a piece of card and then again onto four different pieces of printed paper.  The tree shapes were then cut out of the printed paper and glued into place on the stamped image on the card.  Four pieces of the same printed paper were then glued onto a card base to make a frame behind the focal image of the trees and the card with the trees was then glued into place on top of the frame. They were a lot of fun to make and all four cards were made using just four 6 x 6 inch pages of printed paper and some card.


Next were the owl cards.  These were lots of fun.  The images were stamped and coloured and then mounted onto base cards which were decorated with pretty printed papers and a few little brads.


Another card was made very simply by masking off the bottom half of a card and stamping flowers and foliage along the top of the mask. A piece of green ribbon was added underneath the flower garden and finally a greeting was added to finish it off.  Most of the stamps and papers for the cards above came from Gina K. Designs and inspiration was drawn for the designs from StampTV.


For the last cards we made we tried out a 'sunburst' design.  This was a lot more difficult to get right than it looks but, I am fairly happy with the results. The inspiration for these cards came from images on Google.


Thank you Janet for a lovely weekend!  You can see some of my sister's beautiful card designs over on her blog 'Cards, Cats and Coffee'.


Thursday 16 March 2017

Catching up on the latest TAST stitches....

Today I have had a chance to catch up with the last two stitches for the TAST Challenge hosted by Sharon Boggon at Pin Tangle. The first of these stitches (week 75) was actually a combination of stitches which forms a 'raised herringbone band'. It gives a lovely finished band of stitches and Sharon's tutorial for it can be found here.


For my raised herringbone band, I started with a satin stitch base worked in variegated fine silk thread.  I then added the herringbone stitches using pink perle cotton (8) and finished by weaving a variegated perle cotton (5) through the herringbone stitches.  I am pleased with the results.


The stitch for week 76 was 'whipped chain stitch' of which there are two versions.  I added a line of both to my new sampler.  Sharon's tutorial for both of these stitches is here.


For the first line I added I stitched the base chain stitch with pale apricot perle cotton (8) and then whipped it using variegated fine silk thread.  In this version of the stitch the whole chain stitch is whipped each time.


The second line is the other variation which whips first one side of the base chain stitch and then the other.  For this line I stitched the base chain stitch with blue perle cotton (8) and then whipped it using variegated fine silk thread.


I am already pleased with how my new sampler is looking.... can you see a design emerging?

Tuesday 14 March 2017

Two more embellished circles....

I wasn't feeling up to much stitching last week but, I made up for that a bit over this last weekend.  


I finished embellishing two more of my wool felt circle sets.  I have now added stitches to eight of the twelve circle sets and I am really happy with how they are all looking. It was quite helpful to have a break after stitching the first six circle sets as, it has given me some fresh ideas which stitches to add.


Starting from the outer edge, this first circle set is embellished with palestrina knot using a variegated perle cotton (5).  The next stitch in is Italian knotted border stitch worked using a variegated silk thread.  Then follows a circle of Basque stitch worked in variegated perle cotton (12). Finally, in the centre are a few beaded French knots which I worked using the same variegated perle cotton and five wraps of the needle.


This second set of circles is embellished (again starting from the outer edge) with tete de boeuf stitch in pale apricot perle cotton (8).  This is followed by palestrina knot in pale lilac perle cotton(8).  The middle fabric circle has been outlined with cable stitch in the same pale apricot perle cotton (8) and then the centre is decorated with a whipped woven circle worked in variegated silk thread.


It is such fun deciding on the stitches to embellish the circles with and then bringing them to life as you stitch them.  I am really looking forward now to getting the rest decorated and being able to add some texture in the background too.

Friday 10 March 2017

A mini quilt finish.....

On the second and fourth Tuesdays of each month I participate in a local quilting group.  It is a lovely group of ladies and, we take it in turns to share ideas and projects with the other members.  During the last two sessions of the group a project was shared with us to make the tiniest art quilt (approximately 5 x 5 inches square) that I have ever seen.


I think the inspiration for the project came from the book 'The Art of Embroidered Flowers' by the late Gilda Baron (a book that I will now have to add to my collection!!)   It has been the perfect project to work on as I wasn't very well last weekend and, although feeling better, have been feeling a little 'out of sorts' all week.


The lady who shared the project called it 'Poppy Field' and I am delighted with the finished quilt which is displayed in an empty CD case.  As you can see from the photographs above and below, when you remove the inner section of the CD case a little gap is created at the top of the case, meaning that you can hang the little quilt quite easily.


I definitely think I am going to be having some fun making a few more of these!! 


Thursday 2 March 2017

A new sampler for this week's stitch.....

I just couldn't resist starting a new sampler (and I had some very lovely comments about starting another one - thank you!!) so that I could continue with the latest stitch for the TAST Challenge hosted by Sharon Boggon at Pin Tangle.  Week 74's stitch is 'Buttonholed Cable Chain Stitch'.  It is a very pretty stitch which I just had to try. Sharon's tutorial for it is here.


Before I added the new stitch to the sampler, I drew an outline of the area I am going to fill with stitches and, as I did with my last sampler, I embroidered the outline using a variegated cotton floss and the stem stitch.


The buttonholed cable chain stitch is worked in two parts.  The first is a line of cable chain stitches which I stitched using a pale apricot perle cotton (8). I forgot to take a photo of my cable chain stitches this time round so, this photo is from when I stitched a row as an earlier TAST stitch.


The second is the buttonholing of the chain stitches which I did using my preferred variegated fine silk thread in a orangey-red tone.


When the buttonhole stitches have been added all that you can see of the cable chain stitch underneath are the joining stitches between the 'links' of the chain.  I have decided on a design for the new sampler but, you'll have to wait until I have added a few different stitches before it will be apparent!